How to Install a Level 2 Home EV Charger – DIY vs Professional Installation
Installing a Level 2 EV charger at home can greatly improve your daily driving experience—cutting charging times from over 24 hours with Level 1 to just a few hours. But the big question is: should you install it yourself or hire a professional electrician? In this guide, we’ll explain everything you need to know about Level 2 EV charger installation, including the tools, steps, costs, and risks.
What You Need Before Installing
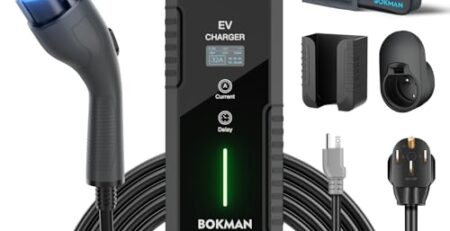
- A compatible Level 2 Charger (like ChargePoint, Grizzl-E, or Tesla Wall Connector)
- 240V outlet (NEMA 14-50 recommended) OR direct wiring point
- Breaker panel space (50A recommended for most models)
- Basic tools: drill, wire stripper, voltage tester
- Knowledge of local electrical codes
DIY Installation: Pros & Cons
Pros:
- Save $300–$800 on labor costs
- Convenient if you already have a NEMA 14-50 outlet
- Satisfying for handy homeowners
Cons:
- Requires knowledge of home wiring and electrical safety
- Risk of voiding warranty or violating code
- Hardwired units require a permit and inspection in most states
When to Hire a Professional Electrician?
- Installing a hardwired charger
- Upgrading your electrical panel
- No existing 240V outlet
- Required by local building codes
Typical Cost (US 2025):
- $400 – $1,000 depending on complexity
- Extra for trenching, outdoor setups, or panel upgrades
Step-by-Step: DIY Plug-In Level 2 Charger Installation
- Turn Off Power at the breaker panel.
- Install NEMA 14-50 outlet (if not present).
- Mount the Charger on the wall using the included bracket.
- Plug the Charger into the outlet.
- Secure the Cable Holster nearby.
- Test the Charger by plugging into your EV.
⚠️ Safety Tip: Always use a voltage tester before touching any wires!
Safety and Legal Requirements
- Local codes may require a permit even for plug-in models.
- Hardwired chargers must pass inspection by city officials.
- Insurance policies might require proof of professional installation.
FAQs
Q1: Can I install a Level 2 charger if I rent my home?
A: Yes, but you’ll need landlord approval. Portable chargers may be better.
Q2: How long does installation take?
A: DIY plug-in: 1–2 hours; Pro hardwired: 2–4 hours plus inspection.
Q3: What’s the risk of DIY install?
A: Fire, shock, or violation of code if improperly wired.
If you have a plug-in Level 2 charger and a proper 240V outlet, DIY can save money and time. But for hardwired units or complex setups, hiring a licensed electrician is the safest, most reliable option.