The Ultimate Guide to EV Charging Accessories in 2026
If you’re reading this, chances are you’ve experienced the freedom of driving electric, but perhaps also the confusion of charging. As an EV owner myself since 2018, I’ve personally navigated the evolution of EV infrastructure—from struggling with sluggish Level 1 speeds to dialing in the perfect Level 2 home setup.
Forget the technical manuals. This guide isn’t about specs; it’s about real-world experience. We’re talking about the accessories that genuinely make your EV life smoother, safer, and more cost-effective. These are the pieces of gear—tested in my own garage, across harsh Texas summers, and on cross-country road trips—that I recommend to family, friends, and now, to you. The goal? To turn your charging confusion into seamless convenience and maximize your return on every accessory dollar.
Setting the Stage: Mastering Charging Levels – My Personal Take
Understanding the charging levels isn’t just about speed; it’s about efficiency and investment. Here’s my no-nonsense perspective on what each level means for your daily driving.
Level 1 Charging (120V): The “Emergency Only” Option
The cord that came with your car? I call it the “Snail Charger.” It typically adds 3–5 miles of range per hour. In my experience, relying on Level 1 is a recipe for range anxiety, especially if you drive more than 40 miles a day. It’s perfect for one thing: the emergency backup plan when you’re visiting Grandma who only has a standard wall outlet. Don’t build your routine around it.
Level 2 Charging (240V): The Game Changer You Must Invest In
This is where EV ownership becomes genuinely convenient. Level 2 charging is your new gas station. Speeds range from 15–60 miles of range per hour.
My Pro Tip: Investing in a quality Level 2 charger isn’t just about speed; it’s about Battery Health. Regular, stable charging is better for your battery pack than relying solely on DC Fast Chargers.
- The Investment: You need a high-quality Level 2 charger. To avoid costly mistakes, start your shopping here: 5 Best Portable Level 2 EV Chargers for Home and Travel – Our Expert Reviews
The Must-Have Accessories: Gear I Can’t Live Without
These accessories solve the daily frustrations of EV ownership. This isn’t filler; this is necessary gear for a veteran owner.
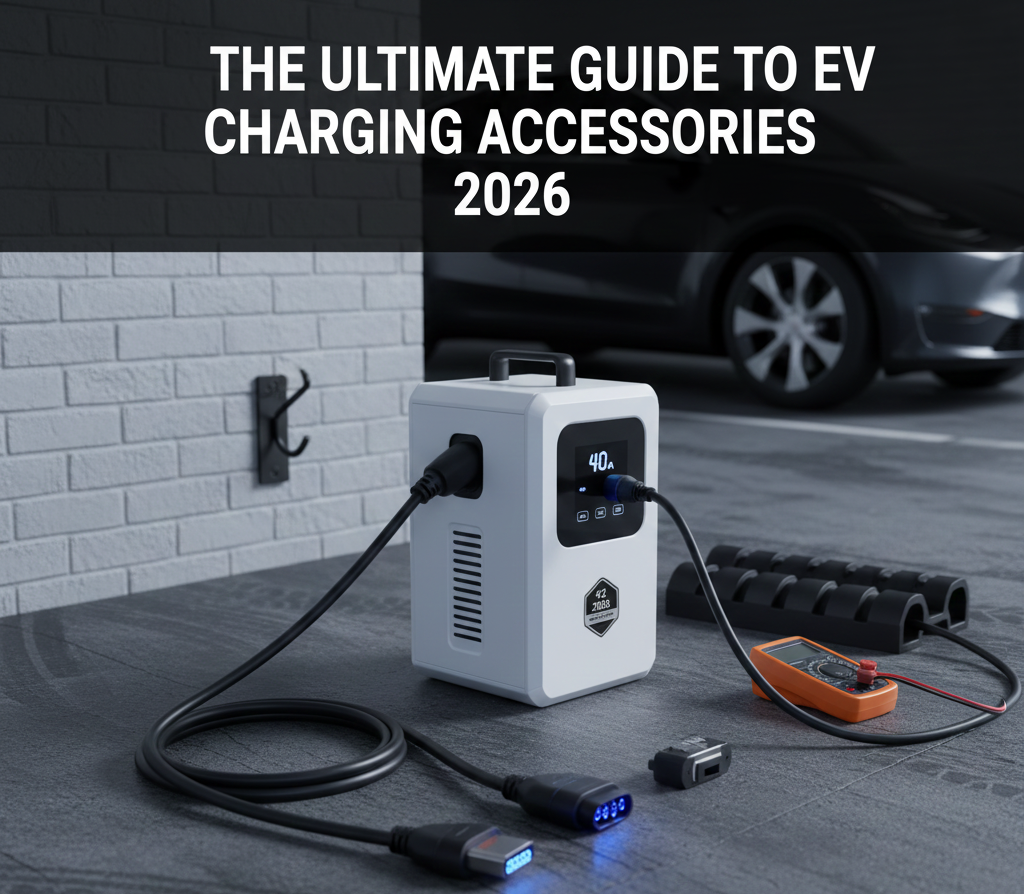
1. Portable Level 2 Chargers: The Swiss Army Knife of Charging
Forget the expensive wall-mounted “stations.” For flexibility, I always recommend a high-quality portable Level 2 unit. They are cheaper to install (just need a 240V outlet) and offer unparalleled versatility.
- Why It Wins: You can take it on vacation or to a friend’s house. You can unplug it and mount it on the wall if you like. This flexibility is non-negotiable.
- What I Look For: I demand high-amperage flexibility (32A to 40A), a 25-foot cable minimum (crucial for maneuvering around a crowded garage), and an IP-rated casing for weather resistance.
- Head-to-Head: Trying to decide between the two most popular models? Read my full breakdown: Grizzl-E vs. JuiceBox 40: Which Home EV Charger is Right for Your Garage?
2. Adapters: Navigating the Connector Chaos
The standardization of the NACS port (Tesla’s design) is a great step, but right now, owning the right adapter is non-negotiable for interoperability.
- J1772 to NACS: If you don’t drive a Tesla, this adapter is your golden ticket to the Supercharger network. But be warned: cheap adapters are a fire risk. You MUST buy certified gear.
- NACS to J1772: For Tesla owners, this is how you access the thousands of older public Level 2 chargers.
- My Experience with Adapters: I’ve seen adapters fail under Texas heat, causing charging sessions to drop. Safety and thermal management are key. Don’t skimp on quality here.
- The Essential Guide: Get all the technical details and safety warnings before you purchase: J1772 to NACS Adapter: Everything You Need to Know Before Buying
3. Cable Management: A Matter of Safety and Longevity
Nothing screams amateur hour more than an expensive charging cable coiled haphazardly on the garage floor, waiting to be tripped over or run over by a car.
- The Solution: Invest in a sturdy wall-mounted cable retractor or holster. It keeps the cable off the floor, protects the expensive connector head from dust and drops, and makes your garage look clean.
- Veteran Tip: Always ensure your holster is positioned high enough so that when you hang the connector, the cable doesn’t drag on the floor.
Making the Right Power Decision: Amperage & Your Breaker Box
This is the most technical part, but it determines your true charging speed. You must size your charger based on your home’s electrical panel capacity.
| Amperage (Charger Output) | Breaker Size Required | My Real-World Speed Estimate (Miles/Hour) | Ideal For |
| 32A (7.7 kW) | 40 Amp Breaker | 22 – 25 miles/hour | The daily commuter; lowest installation cost. |
| 40A (9.6 kW) | 50 Amp Breaker | 28 – 32 miles/hour | High-mileage drivers; recovering range faster after a long day. |
| 48A (11.5 kW) | 60 Amp Breaker | 33 – 40 miles/hour | Maximum capacity for future-proofing and large battery vehicles (like trucks/SUVs). |
Crucial Safety Rule (The 80% Rule): Your charger’s continuous draw cannot exceed 80% of the circuit breaker’s rating. Example: A 40A charger must be on a 50A breaker. Never cheat this rule. Your safety depends on it.
Charging Like a Pro: My Personal Efficiency Hacks
You’ve got the gear; now, here’s how to use it like a pro to save money and battery life.
- Stop Charging at 100%: For daily driving, set your charge limit to 80% or 90%. I only charge to 100% right before a long road trip. This simple trick is backed by experts for preserving your battery’s health over the long term.
- Time Your Charging: Most utility companies offer Time-of-Use (TOU) rates. Program your car or smart charger to only pull electricity during off-peak hours (usually after 11 PM). This practice alone can cut your charging bill by 30% or more.
- The Overheating Check: If you live in a hot climate, feel the connector plug after 30 minutes of high-amperage charging. If it’s excessively hot to the touch, you may have a loose connection in your wall outlet or need a different charger. This is a crucial safety check often overlooked!
FAQs: Quick Answers to Common Charging Questions
You need redundancy. The portable charger is your dedicated road trip companion. If your permanent wall unit fails, you can unplug the portable charger and still charge safely at home using the same 240V outlet.
Yes. Modern EVs have sophisticated Battery Management Systems (BMS). It is perfectly fine (and often encouraged) to leave your car plugged in. The car will manage the charge level efficiently and use the grid to power cabin pre-conditioning, saving your battery’s charge.
The cost varies widely based on your home’s electrical panel. In my experience, a simple installation (panel is close to the garage) can cost between $500 to $1,200. However, if you need a trench dug or a major panel upgrade, the cost can easily exceed $2,500. Always get 3 quotes from licensed electricians specializing in EV installation.
The most common failure point I see is the wall outlet itself, not the charger. If the 240V outlet (NEMA 14-50) was improperly installed or uses cheap components, it can wear out and overheat due to the high, sustained power draw, triggering the charger’s safety mechanisms. If your charger suddenly stops working, check the wall outlet and breaker first.
Use DCFCs sparingly—primarily during long road trips where time is critical. While convenient, frequent reliance on DCFCs, especially high-power ones, can generate excessive heat. Our long-term data suggests that Level 2 home charging is the ideal charging method for battery health and longevity. DCFC should be the exception, not the rule.
NO. Your car dictates the maximum charging speed, regardless of how powerful your charger is. For example, if your car’s onboard charger limits the input to 40 Amps, installing a 48-Amp charger won’t make it charge any faster. Always check your vehicle’s maximum AC charge rate before purchasing a high-amperage unit.
Final Verdict: Optimize Your EV Ownership Today
The right accessories are the bridge between simply owning an EV and truly mastering the EV lifestyle. Don’t let technical details hold you back. Start with a reliable Level 2 charger and the correct adapter, and enjoy the efficiency and convenience you’ve paid for.
Click below to read my full, unbiased reviews on the best gear to upgrade your charging setup: